
I’ve had these belts sitting around for a few months now and they’ve finally come around on my to do list. Thinking this would be nice and easy like the Teac C-3x belts I whipped the cover off my 234 eager to put it back to work transferring those thousands of undiscovered bedroom gems that must be around in peoples’ cupboards.

Tascam 234 4 track tape transport
Looked nicely laid out and well constructed as all this old Tascam equipment seems to be. I thought I’d just take the transport out and it’d be easy. There are just two belts in the 234, the capstan belt and the belt that moves the transport up and down. This cam mode belt had stretched and come off and the capstan belt had pretty much disintegrated. Once I start I find it hard to stop and this isn’t a quick job the first time, you need to be methodical and patient, good screwdrivers help too.
Well here comes the process, it seems pretty daunting at first when you see how many boards, cables and bits you have to remove and disassemble to replace the belts.
Remove Transport
The transport must come out to change belts. The capstan motor and cam motor have to have their mounting plates removed to change the belts and as far as I can see this is impossible unless you remove the transport.
- Remove all screws holding the transport in. These are on the top and base. Be careful not to round and of the screws.
- Turn the deck upside down and remove the half of the base plate under the main PCB.
- You should now have access to all the transport connector blocks. Carefully remove these and clip any cable ties holding bundles together.
- Now you need to unscrew the pitch control bracket from the front fascia. To do this you’ve got to take the front fascia off, that means all the knobs have to be pulled and the screws top and bottom removed. Remember too the little hidden screws holding the transport control buttons. These are in recessed holes access from underneath. Be careful not to remove them totally and then loose them on the floor like I did! Just undo them a little so the panel comes off and lets to remove the whole fascia so you get access to the power button.
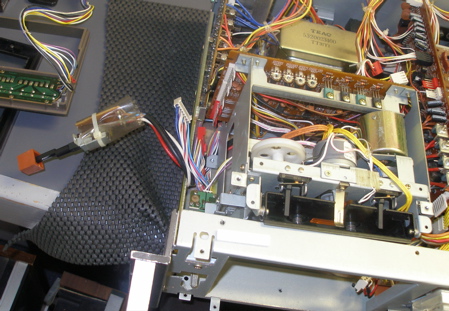
Tascam 234 transport, prepare for removal
- Now you can unscrew the main power button which will let the transport lift out much more easily.
- Very carefully ease the transport up and angled out of the machine. Be careful not to snag any cables. You’ll need to be firm but gentle..

Replacing the Belts
- Now you’ve got the transport free, give yourself some space on your workbench and have a look around the transport to familiarise yourself with it.
- We need access to the motor and capstan area underneath the control PCB.
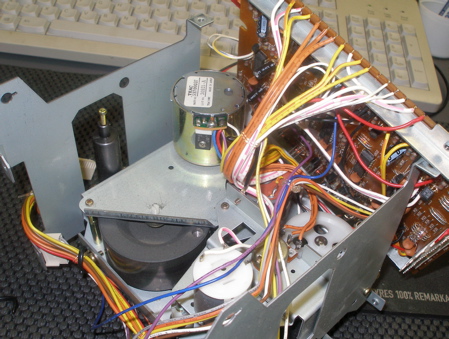
Tascam 234 transport control PCB removed
- Undo the two screws on the control PCB and carefully lift it up so you can unslot the PCB from it’s hinge at the other end.
- Now you can almost access the cam mode motor and the capstan but you need to remove some more screws.
- This is where it starts to get tricky! You can do the cam mode belt first. This is the belt that is square sectioned and moved the headblock up and down depending what the tape deck is trying to do.
- Remove the three screws that hold the metal plate down that the cam mode motor is fixed to.
- You can now lift this up, and get the old belt out and hook the new belt around the large pulley while lowering the plate back down. You must lift the plate, the belt cannot be replaced without doing this.
- WARNING – Make sure you clip the white gear with the slot over the section in the large black cam wheel. If you forget or don’t do it right the PLAY, FF, RW etc modes will all be wrong and not work and you’ll have to take the transport all out again! Beware I did it!! I don’t have a picture of it as I was so annoyed at having to do this all again I forgot.
- Now you can screw the plate back down and using tweezers or a bent paper clip hook the cam belt over the motor pulley. I think I managed to put it on while the plate was off and get it back on without it falling off.
- Now for the capstan pulley which I found the hardest.
- Remove a few more screws to lift the plate the capstan pulley and motor is attached to. Now the capstan can be lifted out. Be careful to lit it straight up and not bend it.
- This is a good time for a bit of lubrication. Put some very light oil on the capstan shaft where it goes into the bushing. I use Prolong Precision Oil which comes in an easy dispenser. Also using IPA clean up the capstan wheel if there’s any left over trace of old belt and put a dab of grease on the end of the capstan where it gets held by the capstan plastic tension screw.
- What I did next was hook the capstan belt over the capstan, trying not to get any grease or oil on it, then pull it over the motor pulley. You kind of have to hold the plate and motor taught in one hand while you do the belt threading and also keep this up when you relocate then plate in the transport with the screw holes lined up – Took me a few attempts but I got there in the end.

Reassembly
- Reassembly is the reverse of disassembly as Haynes manuals often say! Just dont rush and it’s worth checking the belts are really on correctly and the little white bit in the cam gears is located correctly.
- Put the rest of the transport together, the control PCB and relocate the wires that you may have disturbed. There’s black stiff wire that can be wrapped around the cables to stop them fouling anything moving.
- Put the transport back into the deck but take care to locate the cables so they’re not getting fouled or pulled to tight. You did take some digital photos before you took it apart didn’t you?
- Remake all the connector connections. You can’t really get these wrong as they are colour coded and different sizes.
- Screw the power switch back on.
- Feed the transport control panel cables back in and hook this up to the front panel.
- Relocate the front panel. You may have to move the VU meters a little to get it to slot back in and nudge the push switches. Just don’t force anything.
- Almost done now. Just screw everything backup and switch on!
Testing
- Double check all your connections are right and you haven’t left any screws of tools lying around inside the machine!
- Power it back on check the transport functions. It should move into play, FF, RW, STOP etc smoothly and quickly. You may need to adjust the STOP control POT to make sure the head base is at it’s lowest position when in stop. Use a ceramic adjuster for this if you have one.
- If everything is working: well done. If it doesn’t go into STOP properly and let you eject and it eats tape, you’ve probably done what I did and not locate the cam mode gears / followers correctly and I’m afraid you’ll have to take it all apart to fix. It’ll go much quicker the next time though if it makes you feel any better!!
Much thanks for this article. I’m about to do a 234 along with 3 or more other Tascams and will most likely need it even though I have the service manual.
Would you by chance have belt dimensions on what you put in? I found what looks like a good source for them (studiosoundelectronics.com) but would rather keep the machines intact until I round up the belts. I’ll also be doing an original 122, a 122mkII, a Porta Two (not 02), a Teac 435X, and maybe a 34B (which I may need to get from them).
It would be nice to have an archive somewhere of what the sizes actually are, as the service manuals usually just give Teac part numbers and they were sort of pricey there from what I remember way back.
Much appreciated either way!
Hi George,
Having fitted the belt now, I don’t know the dimensions I’m afraid. I’ll admit to be lazy where this is concerned and have paid the premium (small premium) to ebay sellers to get the right sized belt. I’ve used the ebay seller marrscommunications for my belts. His belts seem the right size and he offers all the Tascam / Teac ones. I know there’s lots of people doing this on eBay but this seller is honest and efficient. Good luck with your belt replacements.
Adrian
Where can I get belts for a Tascam 234?
Mike, you can find replacement belts on Ebay
I’m looking for the smaller ones that go on the drive motor, this doesn’t come in the kit.
Small comments – From Replacing the Belts Step #5. It seems like the belt in the kit is too small, but it actually is OK once you fit it on.
Step #12 I would skip the lubrication. Most people do not use their recorders all that much. The lubrication will last for normal use.
What will decay regardless of whether you use it or not is the capstan belt. Plus the fact that it is pretty flimsy to begin with. If you do not do this, it will be one less thing to go wrong during the repair.
Step #8 Great advice in the write up.
Step #13 I did a very bad thing. I got the bottom post under the belt on reassembly. Guess what did not turn when I put it all back together.
BIG COMMENT – being I found this out late (it seemed to turn OK by hand when moving the capstan, but under motor power IT WENT NOWHERE : )
I looked at the problem, and said, you know this TASCAM was probably made for repair. And no one would make money off repairing it how I just did.
Step #3 talks about the board hinge. Well, you can do this without doing “Remove Transport” Steps #1 through #6. Get a nice 4″ (not including the handle) flex Philips screwdriver. Take off two screws on the three point capstan motor mount. Then slide it out of the third point. It seems like the door damper will not let you move the capstan motor mount as much as it needs to move. It will. It is made to be repaired like this — the slot for the damper accommodates movement.
The front face plate did not fit together very well once I put it all back together via the method of taking it all apart (“Remove Transport” Steps #1 through #6). The shorter method will eliminate this problem.
ADDITIONALLY, the clear (smoke) cassette door pops off by pulling up on it. I messed up the looks by trying to unscrew the plastic screw backings which show on the front of the clear plastic cassette door.
THANKS FOR THE ORIGINAL POSTING. EVEN WITH MY CORRECTIONS, THIS ARTICLE AND PICTURES GAVE ME A JUMP START. WHO KNOWS WHAT I WOULD HAVE DONE LEFT TO MY OWN DEVICES : )
Hey thanks for the article I almost have mine working with the exception of the play button. FWD, REW, STOP all work but when I press PLAY the green play button lights up and the belt that moves the transport spins one way for a second, stops, and then spins back. Nothing happens after that. RECORD is the same way.
Any help on this would be great thanks!
Hello!
I recently inherited one of these machines and it seems to be having some trouble with the play/record drive system. The unit had been sitting in an attic for some time when it was given to me so the heads are naturally very dirty but surprisingly, the belts look brand new! The deck can fast forward and rewind without issue but whenever I try to play, the speed begins to play at ALMOST full speed, but gradually slows further until it stops. Of note is that when it stops, it also shuts off the record function, if active. It’s just like pressing stop, but without actually doing so. Is this likely to be a motor? What am I looking at in terms of difficulty and cost to repair a problem such as this? I’m really looking forward to getting this running, albeit as cheaply as possible.
Also, it looks like many of the parts inside this machine are plastic. Is greasing/applying oil to these parts as outlined above really a good idea? Sounds to me like you’d have less-than-tasty bubblegum after a while!
Appreciate any input! Feel free to email me direct as well: bgates1983@gmail.com
Hi..
Your problem sounds very much like a capital belt problem. These belts are always worth changing as they degrade over time even if they look ok.
Regarding lubrication, I’d leave that as more harm can be caused. If any grease has gone solid, then it should be cleaned off the part and sparingly reapplied.
Good luck
Adrian
Bruce, I have a similar problem, except that after taking my 234 out of storage for about 15 years, the tape will not move when play is pressed. FF and RW work fine. Were you able to resolve your problem? I have some stuff I’d really like to get off of some old tapes.
Thanks to everyone for this helpful thread. I have got my transport removed now, and I discovered that the capstan belt was **liquefied** into a tar-like substance. I have now managed to clean all that gunk off the flywheel and pulley (it dissolved nicely in alcohol), so I guess I just need to get my hands on a belt and I can get this thing done. Again, thanks so much for providing this obscure information!!!!
I have one of these in near mint condition where the capstan belt has “melted” away, I see belts on the net but they seem very expensive, anyone found in Uk that sells them at a resonable price.
update: I obtained the capstan belt and replaced it, I later found that the pinch roller and idler tires had gone soft, so replaced them at the same time, the unit is working like new again!
in the process of doing this I have become unsure of what exactly to do in step 8. You mention the small slotted white gear over the large CAM wheel, and making sure not move it but I’m unclear where exactly it should be sitting when putting it back together. I initially couldn’t identify this small gear that I dare not move and now that I finally have identified it I worry that I may have moved it.
Can anyone describe where it should be? It looks as though the small slotted arm is supposed to clip over the only cross brace on the inside of the Cam wheel. Or, as the post seems to suggest to me should this small slotted arm on the small white slotted gear just sit Inside the proper portion of the divided Large CAM wheel?
I hope this makes sense to someone…maybe I’ll just try it and hope for the best.
thanks
jpa
A very useful set of instructions for replacing Tadscam 234 belts. I followed them and successfully changed belts, and while doing so took photos and generated my own instructions. Together with the original brochure and some sound comparision files, the instructions can be downloaded from: http://www.mediafire.com/?1pac1q9wd64hb
Very impressive, I have done that task a couple of times however I recently replaced the two rubber tyres on the tape take up spools and since reassembly all is well except that there is no fast forward function. I checked all the connections throughout and all seems to be connected as intended. Any ideas?
just replaced my belt, per your wonderful detailed instructions, and it works. Thanx for the time and effort you put into this. Ive always been a DIY’r, but when it can to something like this I would leave it to a pro…..and also this job is not for the faint at heart, very tedious….thanx again
11/24/2012
I successfully replaced the two belts, but when reassembled, ffwd/rwd/play do not work. I see the heads move up/down as expected, and I can sometimes here the motor spin for ffwd/rwd. I notice that on the motor in the top middle of the assembly there’s another belt or rubber surface that’s all gummed up and disintegrated like the other two belts were. It’s difficult to see, but is visible when looking from top left (when facing the machine). Is this another belt that needs to be replaced or a rubber roller of some sort?
tom zudck says:
I successfully replaced the two belts, but when reassembled, ffwd/rwd/play do not work. I see the heads move up/down as expected, and I can sometimes here the motor spin for ffwd/rwd. I notice that on the motor in the top middle of the assembly there’s another belt or rubber surface that’s all gummed up and disintegrated like the other two belts were. It’s difficult to see, but is visible when looking from top left (when facing the machine). Is this another belt that needs to be replaced or a rubber roller of some sort?
Also i have the same problem-how i can find this RUBBER ROLLER sparepart?
leledolci@libero.it
Hi Greatbear. I am having difficulty removing the perspex door from the face of my 234. This subsequently wont allow successful removal of the face of my 234. Any suggestions???
Thanks in advance.
Any ideas how to remove the perspex tape door from the 234?
Thanks.
Hi, I replaced both belts and pinch roller. Everything
is working just fine, except the record button
wont work. What can be wrong?
the heads go up and the heads go back down and continue to cycle like this as soon as i power on the unit. I replaced the contol boards a and b to no avail. I don’t know what to do next and would appreciate suggestions.
I have a tascam 234, i am changing a pinch roller and theres a spring with it. i can’t seem to figure out how the spring goes in. i would greatfully appreciate it. pic if possibe… i’m going crazy with it. Thanks in advance, Mark.
Is this the same for a 246?
I bought a 234 used off ebay. All the rubber components have turned to goo over time. Anyone know where I can buy new Idler Tires? Also having trouble replacing the pinch roller.
Hi,
I don’t know if this thread is still active but, if it is, I would appreciate some advice about my 234. I recently replaced the drive belts and rubber idler wheels and, after putting it back together, the fast forward function doesn’t work. All other operations do – rewind, play, stop – so it seems unlikely that I have misaligned the cam – but I can’t think of any other solution. I’ve checked the operation of the actual button and this appears to be fine in that there is an electrical contact when it is pressed. The idler wheels move to rewind and to take up the tape on play correctly but, when f/fwd is pressed nothing happens. Any ideas?